Composting is the most environmentally friendly way that you can dispose of kitchen and garden waste. Greensleeves recently put together a guide to composting, but wanted to look in more detail at worm composting! This is a different way to compost that uses worms to help break down the waste into a fertilising compost.
Not only is worm composting an efficient way to use your waste, it’s also a great alternative for those who don’t have room for traditional compost bins or heaps. Wormeries can be very small and fit into urban gardens and spaces.
What Is Worm Composting?
The idea of worm composting is very much the same as that of traditional composting. Kitchen waste (and garden waste) is added to the compost bin (or in this case, wormery) and is broken down into compost which is rich in nutrients and perfect for using in your garden.
It’s a lot better for the environment to compost your kitchen waste rather than sending it to a landfill or incinerator. You can read more about traditional composting on our blog all about compost!
The biggest difference between traditional composting and worm composting is, of course, the worms. The worm bin, or wormery, is a bit different from a normal compost bin too. This is to accommodate the slightly different process.
Firstly, it’s usually much smaller than a normal compost bin, and secondly, it normally consists of two sections. The first section is where the waste is added and the worms break it down and the second section collects the liquid fertiliser that it produces.
Rather than just producing normal compost, a wormery also produces concentrated liquid fertiliser. This can be added to potted plants or soil to enrich it and feed plants.
The Wormery
You can buy ready-to-go wormeries from a range of places that need to be filled with moist bedding material in the bottom for the worms to bury into, followed by the worms and then a top layer of kitchen waste (no more than 10cm thick). It then has to be left for at least a week to allow the worms to settle in.
Conditions
It’s important that the wormery is kept in the right conditions so the worms can thrive.
The optimal conditions for the wormery are:
- Between 18-25ºC, which is the best temperature for worm activity. When the temperature drops below 10ºC or above 30ºC the worm’s don’t necessarily die (depending on how extreme the temperature gets) but their activity notably decreases.
- A pH between 6.5-7.0. Worms don’t do well in extremely acidic conditions.
- Good ventilation and drainage to prevent waterlogging. Waterlogging restricts the worms’ access to air.
Other conditions that are important to consider when starting a wormery are placing it in a sheltered place, such as in a shed, to keep the temperature from fluctuating too extremely. It’s also worth being aware that if a wormery is neglected, it sometimes produces an unpleasant smell. If you’re keeping it inside your house, such as in a kitchen, you should keep this in mind.
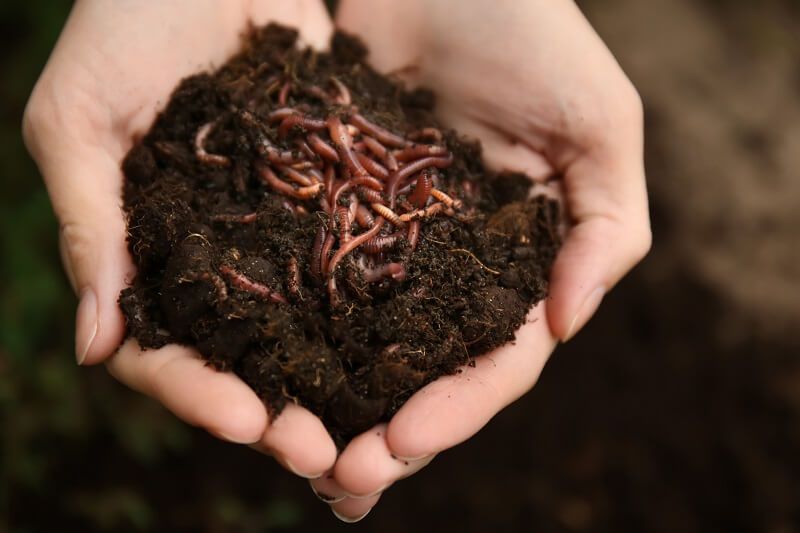
The Worms
The worms used in composting aren’t the same species of worms that you find in your garden — the most common of which being earthworms. Instead, the most common species of worms used for worm composting are brandling, manure, red or tiger worms. They are smaller than garden worms and more red in colour.
It’s important that normal earthworms aren’t used in a worm compost bin because earthworms live in soil while composting worms live in decaying organic matter.
The worms eat kitchen waste, breaking it down into a highly concentrated fertiliser.
Using Your Wormery
The best way to use a wormery is to frequently add small amounts of waste — rather than adding large amounts in one go. This ensures the worms have a constant supply of food without being overwhelmed by too much waste in one go, which can reduce oxygen.
Tips for adding waste:
- Chop waste up into small pieces so it can be eaten easily.
- Add little and often
- Place the food on top of the wormery or bury the food within the compost to create feeding pockets. Both work well.
- If the waste isn’t being broken down, then hold off adding any more until the worms can work through it.
- Don’t add more than the worms can eat.
What Can I Add?
Most kinds of organic kitchen waste can be added to your wormery and it’s good to mix the kinds of food your giving the worms. This includes:
- Fruit
- Cooked vegetables
- Raw vegetables (except for raw onions, garlic and shallots)
- Tea leaves and coffee grounds
- Egg shells (broken into small pieces)
- Small amounts of bread
- Garden waste like weeds and leaves
It’s okay to add things that have seeds in, but remember that the seeds might germinate and try to grow in the wormery!
Maintaining the Wormery
The wormery won’t need a lot of maintenance, but here are some top tips to ensure that the worms and their environment stays healthy:
- Keep the lid on the womery so it stays moist. You shouldn’t ever need to add water, but if the lid has been left off and it becomes dry, then you might need to add a small amount.
- When the worms have been fed, they can go without food for as long as four weeks. So you can go on holiday without having to worry about them. However, the liquid might accumulate and cause waterlogging if it’s not drained off regularly.
- It’s worth occasionally checking the wormery by gently using a garden fork to churn the contents and check the worms are there and healthy.
It normally takes 8-12 months for the wormery to fill up with compost and it will then need emptying. You need to separate the worms from the compost. They will be in the top 20cm of the wormery, so if you remove this part, the rest should be free from worms. You can then use the part with the worms to restart the wormery again and use the nutrient rich compost in your garden.
Lots of worm bins are designed to automatically separate the usable compost from the layer with the worms in, making it very easy for you to empty the wormery.
The liquid from the wormery should be diluted with lots of water (1:10) and then used to water plants.